Getting started with the Episerver Content Delivery API
5 easy steps to start using the Content Delivery API beta on your Episerver site
The Episerver Content Delivery API enables you to access IContent over HTTP for use when building your Episerver site or building external applications in a Headless or Decoupled manner. This post aims to get you started quickly by walking through the required steps to install it on your site and begin accessing content via the APIs.
Note: The Content Delivery API is still in beta, and subject to change. I’ll update this post if things change during the beta period.
Step 1: Install the Nuget package
While the Content Delivery API will eventually surface into multiple nuget packages, the beta package contains all three APIs (Content, Search, Site Definiton), and an OAuth implementation within a single package.
This means you’ll need to take a dependency on Web API, Episerver Find and ASP.NET Identity in your project in order to give it a test drive. The nuget package will manage these dependencies for you.
Install the nuget package in the Web project of your solution using the Nuget Package Manager UI or via command line:
Install-Package EPiServer.ContentDeliveryApiStep 2: Initialize the APIs
Once the nuget package is installed, you’ll need to add a few lines to the ConfigureContainer method of an IConfigurableModule Initialization module:
context.InitializeContentApi();
context.InitializeContentSearchApi();
These lines wire up the required services to ensure the APIs will begin to work. In addition, you should ensure that Attribute Routing and CORs are enabled in your Web API Global Configuration like so:
GlobalConfiguration.Configure(config =>
{
    //Other config settings may already be here, but ensure these are added:
    config.MapHttpAttributeRoutes();
    config.EnableCors();
});
From there, you should be able to start your site up, but we’re not done just yet.
Update 3-19-2018: If you are testing the Content Delivery API out with the Alloy templates (or an empty Episerver site), you’ll need to ensure you add a full
GlobalConfigurationfor Web API as it’s not enabled by default. I recommend pulling the configuration from Episerver Quicksilver’s SiteInitialization.cs and the connected StructureMap dependency resolver classes. Thanks to Kenny Gutierrez and Mikael Söderman for pointing out the issue.
Step 3: Expose content via the Required Role
For security reasons, the Content Delivery API requires that you make an explicit action to expose content via the API. This is done through the Episerver Access Rights system via a concept called the “Required Role”.
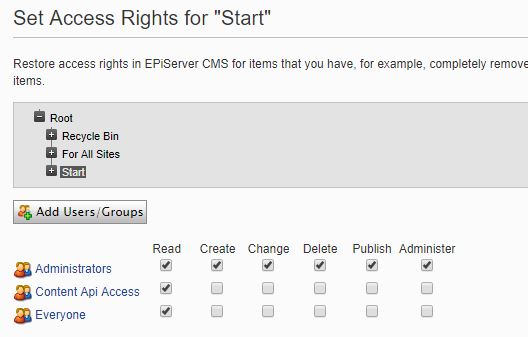
Once your site starts up, use the Set Access Rights tool within Admin mode, assign the “Content Api Access” role with “Read” permission to any content you want to expose (Pages, Blocks, or Media) in the APIs. You can do this hierarchically if you’d like, or assign individual content items.
Here’s an example of how I assigned the correct Required Role on my Start Page:

Note: It’s important to only expose content that does not contain secure information within it’s property data, such as any API keys or other secure data you might have stored on content within Episerver. If content is assigned the Required Role and is anonymously accessible, all property values can be accessed by anyone via the API. You’ve been warned.
Step 4: Re-index Episerver Find
The Content Delivery API leverages Episerver Find to store a serialized version of each instance of IContent on the standard Episerver Find models. This is done for performance reasons. While assigning the Required Role may have triggered a re-index of the affected content items, I recommend running the “EPiServer Find Content Indexing Job” in Admin mode to ensure data is properly re-indexed.
Step 5: Query away!
If you’ve made it this far, you should be ready to use the APIs. To test if everything is working correctly, first open your browser and navigate to the Site Definition API:
http://<your-site-url>/api/episerver/v1.0/site/
You should receive a 200 OK response which contains the configured sites within your solution that looks similar to this:
[{
	"Name": "Music Festival",
	"Id": "a594dfae-2afe-4be6-a4ea-dcd35d8835a4",
	"ContentRoots": {
		"ContentAssetsRoot": {
			"Id": 4,
			"WorkId": 0,
			"GuidValue": "99d57529-61f2-47c0-80c0-f91eca6af1ac",
			"ProviderName": null
		},
		"GlobalAssetsRoot": {
			"Id": 3,
			"WorkId": 0,
			"GuidValue": "e56f85d0-e833-4e02-976a-2d11fe4d598c",
			"ProviderName": null
		},
		"RootPage": {
			"Id": 1,
			"WorkId": 0,
			"GuidValue": "43f936c9-9b23-4ea3-97b2-61c538ad07c9",
			"ProviderName": null
		},
		"WasteBasket": {
			"Id": 2,
			"WorkId": 0,
			"GuidValue": "2f40ba47-f4fc-47ae-a244-0b909d4cf988",
			"ProviderName": null
		},
		"StartPage": {
			"Id": 5,
			"WorkId": 0,
			"GuidValue": "5894fd79-046d-4823-8086-fceffa5c60cb",
			"ProviderName": null
		}
	},
	"Languages": [{
		"IsMasterLanguage": true,
		"DisplayName": "English",
		"Name": "en"
	}, {
		"IsMasterLanguage": false,
		"DisplayName": "Swedish",
		"Name": "sv"
	}]
}]
If that response returns correctly, you should be good to begin using the Content and Search APIs to access your data.
I recommend using Postman alongside the official Swagger documentation to understand the request and response formats. You can also reference my lab activity from Episerver Ascend for examples of making various requests in Javascript using axios.
Update 3-19-2018: Episerver has introduced a version segment into the routing of the Content Delivery API (denoted above in the Site Definition API URL). The Swagger documentation has yet to be updated accordingly, but I’ve reported the issue to Episerver. In the meantime, just attach the v1.0 segment for all requests to the other APIs (Content, Search).
Happy querying!
